
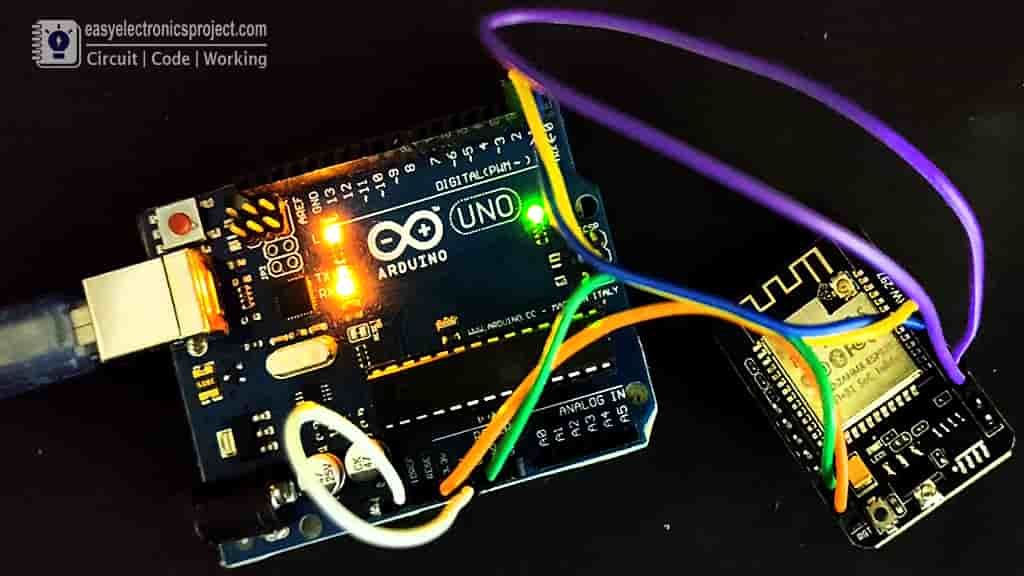
Here, we will discuss how to program ESP32-CAM using Arduino UNO. I will not use any FTDI or other USB to TTL converter to program the esp32 camera module. Here I have used only ESP32CAM Arduino UNO.

Circuit of ESP32CAM Arduino
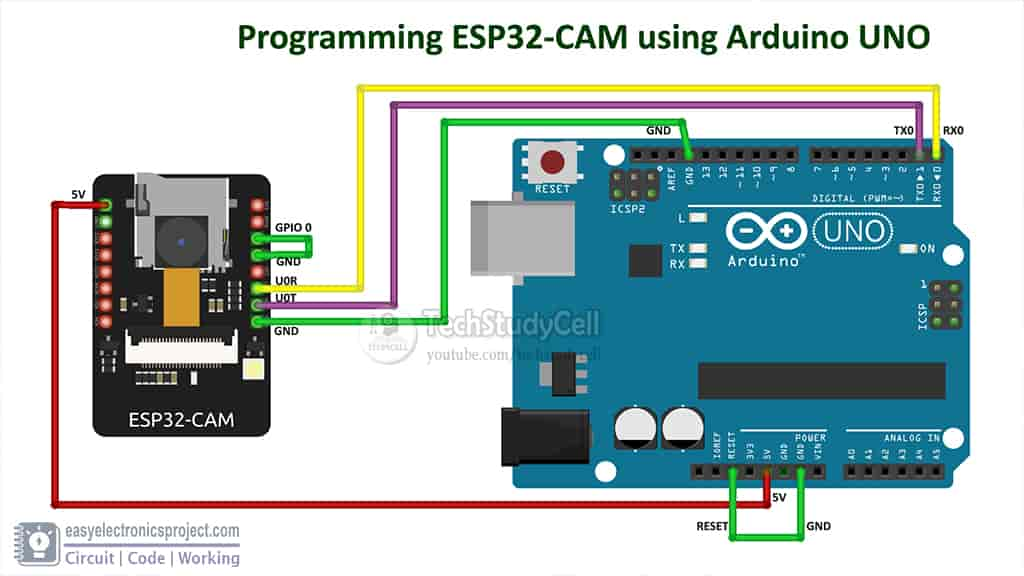
As you can see, we can easily connect the ESP32-CAM module with Arduino UNO to upload code from Arduino IDE.
ESP32CAM Arduino UNO connection:
| ESP32CAM | Arduino UNO |
| U0T | TX |
| U0R | RX |
| 5V | 5V |
| GND | GND |
| GPIO-0 –> GND | Reset –> GND |
Arduino IDE setup for ESP32-CAM
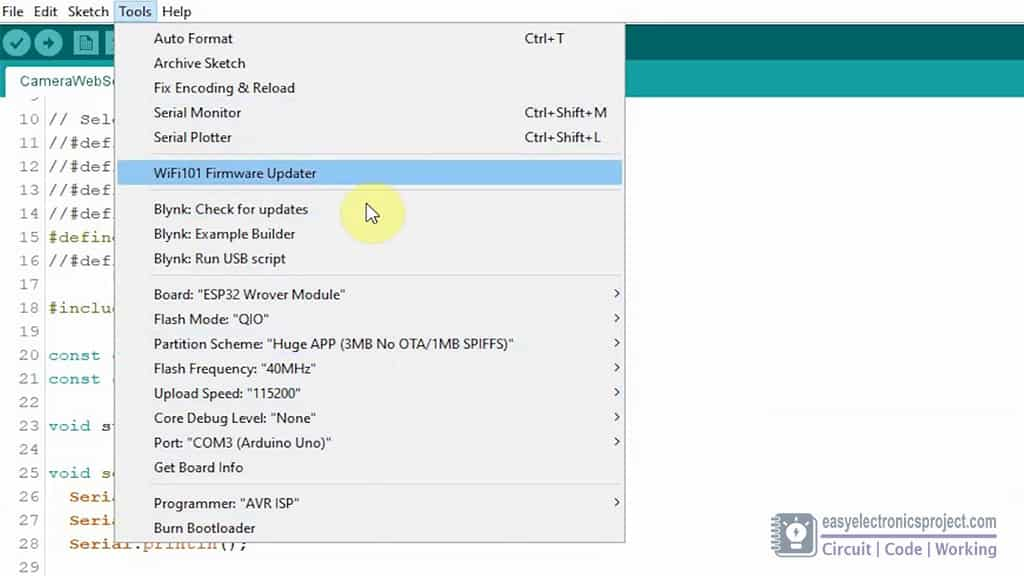
Before uploading the code to ESP32-CAM module, please check the following setting:
- Update the Preferences –> Aditional boards Manager URLs: https://dl.espressif.com/dl/package_esp32_index.json, http://arduino.esp8266.com/stable/package_esp8266com_index.json
- Board Settings:
- Board: “ESP32 Wrover Module”
- Flash Mode: “QIO”
- Partition Scheme: “Hue APP (3MB No OTA/1MB SPIFFS)”
- Flash Frequency: “40MHz”
- Upload Speed: “115200”
- Core Debug Level: “None”
- Programmer: “AVR ISP”
- COM Port: Depends On Your System
- GPIO 0 must be connected to GND pin while uploading the sketch
- After connecting GPIO 0 to GND pin, press ESP32 CAM on-board RESET button to put the board in the flashing mode
After uploading the code disconnect the GPIO-0 pin from GND pin.
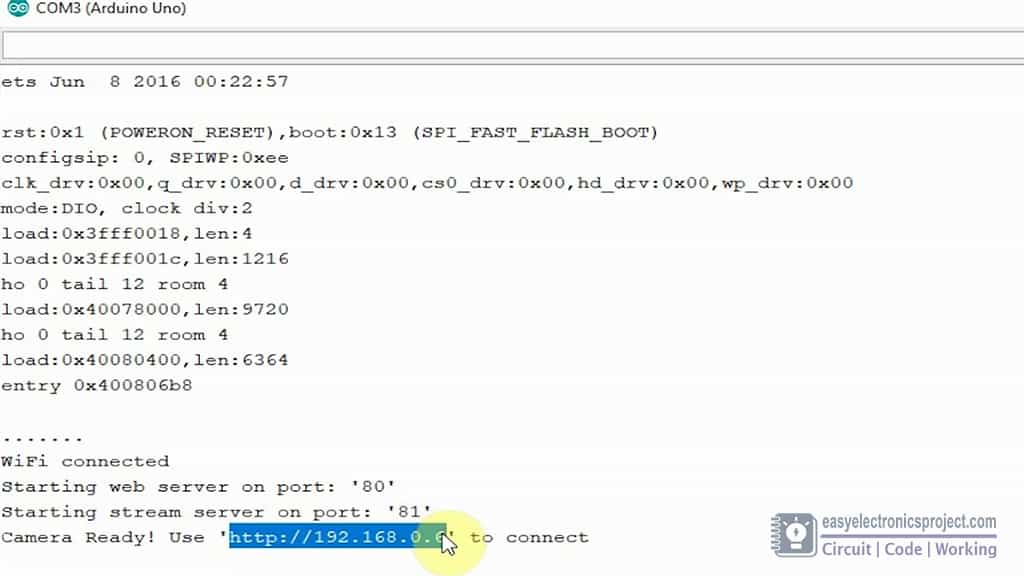
Now to get the IP address of ESP32 camera module:
- Open Serial Monitor
- Set the Baud rate to 115200
- Press the ESP32 CAM on-board RESET button
Now you can copy the IP address and paste it to any browser to start the video streaming.
#include "esp_camera.h"
#include <WiFi.h>
//
// WARNING!!! PSRAM IC required for UXGA resolution and high JPEG quality
// Ensure ESP32 Wrover Module or other board with PSRAM is selected
// Partial images will be transmitted if image exceeds buffer size
//
// Select camera model
#define CAMERA_MODEL_WROVER_KIT // Has PSRAM
//#define CAMERA_MODEL_ESP_EYE // Has PSRAM
//#define CAMERA_MODEL_M5STACK_PSRAM // Has PSRAM
//#define CAMERA_MODEL_M5STACK_V2_PSRAM // M5Camera version B Has PSRAM
//#define CAMERA_MODEL_M5STACK_WIDE // Has PSRAM
//#define CAMERA_MODEL_M5STACK_ESP32CAM // No PSRAM
//#define CAMERA_MODEL_AI_THINKER // Has PSRAM
//#define CAMERA_MODEL_TTGO_T_JOURNAL // No PSRAM
#include "camera_pins.h"
const char* ssid = "*********";
const char* password = "*********";
void startCameraServer();
void setup() {
Serial.begin(115200);
Serial.setDebugOutput(true);
Serial.println();
camera_config_t config;
config.ledc_channel = LEDC_CHANNEL_0;
config.ledc_timer = LEDC_TIMER_0;
config.pin_d0 = Y2_GPIO_NUM;
config.pin_d1 = Y3_GPIO_NUM;
config.pin_d2 = Y4_GPIO_NUM;
config.pin_d3 = Y5_GPIO_NUM;
config.pin_d4 = Y6_GPIO_NUM;
config.pin_d5 = Y7_GPIO_NUM;
config.pin_d6 = Y8_GPIO_NUM;
config.pin_d7 = Y9_GPIO_NUM;
config.pin_xclk = XCLK_GPIO_NUM;
config.pin_pclk = PCLK_GPIO_NUM;
config.pin_vsync = VSYNC_GPIO_NUM;
config.pin_href = HREF_GPIO_NUM;
config.pin_sscb_sda = SIOD_GPIO_NUM;
config.pin_sscb_scl = SIOC_GPIO_NUM;
config.pin_pwdn = PWDN_GPIO_NUM;
config.pin_reset = RESET_GPIO_NUM;
config.xclk_freq_hz = 20000000;
config.pixel_format = PIXFORMAT_JPEG;
// if PSRAM IC present, init with UXGA resolution and higher JPEG quality
// for larger pre-allocated frame buffer.
if(psramFound()){
config.frame_size = FRAMESIZE_UXGA;
config.jpeg_quality = 10;
config.fb_count = 2;
} else {
config.frame_size = FRAMESIZE_SVGA;
config.jpeg_quality = 12;
config.fb_count = 1;
}
#if defined(CAMERA_MODEL_ESP_EYE)
pinMode(13, INPUT_PULLUP);
pinMode(14, INPUT_PULLUP);
#endif
// camera init
esp_err_t err = esp_camera_init(&config);
if (err != ESP_OK) {
Serial.printf("Camera init failed with error 0x%x", err);
return;
}
sensor_t * s = esp_camera_sensor_get();
// initial sensors are flipped vertically and colors are a bit saturated
if (s->id.PID == OV3660_PID) {
s->set_vflip(s, 1); // flip it back
s->set_brightness(s, 1); // up the brightness just a bit
s->set_saturation(s, -2); // lower the saturation
}
// drop down frame size for higher initial frame rate
s->set_framesize(s, FRAMESIZE_QVGA);
#if defined(CAMERA_MODEL_M5STACK_WIDE) || defined(CAMERA_MODEL_M5STACK_ESP32CAM)
s->set_vflip(s, 1);
s->set_hmirror(s, 1);
#endif
WiFi.begin(ssid, password);
while (WiFi.status() != WL_CONNECTED) {
delay(500);
Serial.print(".");
}
Serial.println("");
Serial.println("WiFi connected");
startCameraServer();
Serial.print("Camera Ready! Use 'http://");
Serial.print(WiFi.localIP());
Serial.println("' to connect");
}
void loop() {
// put your main code here, to run repeatedly:
delay(10000);
}


0 Comments