
ABOUT THIS PROJECT
You already know what we are gonna do today…so lets get started !
Things you’ll need :-- Arduino board
- Breadboard
- Bluetooth module/sensor – HC05
- Couple of jumpers/single stranded wires
- LEDs
- An ANDROID(obviously 😛 )
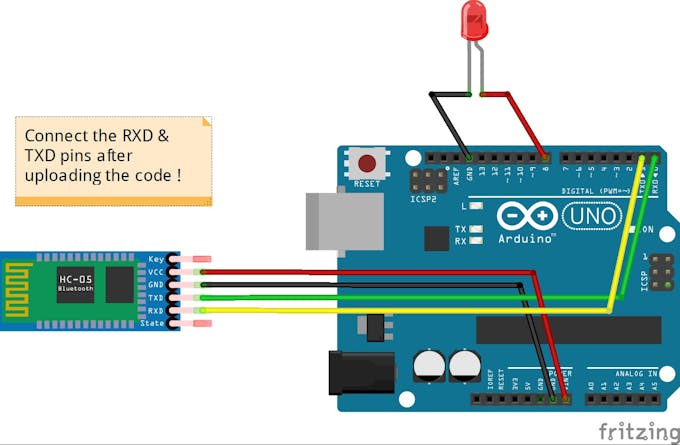
VCC – to VCC of Arduino. GND – to GND of Arduino. RX – to digital pin 0(TX pin) of Arduino. TX – to digital pin 1(RX pin) of Arduino. (connect RX & TX pin after uploading the code)
Of LED – Positive terminal – to pin 8 of Arduino. Negative terminal – GND of Arduino.
අපි අද කරන්න යන්නේ කුමක්දැයි ඔබ දැනටමත් දන්නවා… ඒ නිසා ආරම්භ කිරීමට ඉඩ දෙන්න!
ඔබට අවශ්ය දේවල්: -
Arduino පුවරුව
පාන් පුවරුව
බ්ලූටූත් මොඩියුලය / සංවේදකය - HC05
ජම්පර් යුවළක් / තනි අතරමං වූ වයර්
LED
ඇන්ඩ්රොයිඩ් (පැහැදිලිවම 😛)
වීඩියෝ නිබන්ධනය පහළින්
බ්ලූටූත් මොඩියුලයේ සම්බන්ධතා HC05: -
VCC - Arduino හි VCC වෙත. GND - Arduino හි GND වෙත. ආර්එක්ස් - ආර්ඩුයිනෝ හි ඩිජිටල් පින් 0 (ටීඑක්ස් පින්) වෙත. TX - Arduino හි ඩිජිටල් pin 1 (RX pin) වෙත. (කේතය උඩුගත කිරීමෙන් පසු RX & TX pin සම්බන්ධ කරන්න)
LED වලින් - ධනාත්මක පර්යන්තය - Arduino හි 8 වන ස්ථානයට. Ter ණාත්මක පර්යන්තය - ආර්ඩුයිනෝ හි GND.
Download the app called BlueControl (It’s free). Here is the linkOpen the app Blue control (It will automatically turn on the device’s Bluetooth). Go to options. Click on “Connect to Robot”. Choose the device – HC 05.
- Make the connections as shown in the above image. Don’t connect the RX & TX pins WHILE/BEFORE uploading the code !
- Copy the code given below.
- When you are connecting to the Bluetooth module for the first time, it will ask you the password. Enter 0000 OR 1234.
- When the device gets successfully paired with the sensor, the LED lights on sensor will start blinking at a slower rate than usual.
- DONE. Copy the code given below & test it out !
Code for BLuetooth sensor HC-05:
void setup() {
Serial.begin(9600);
 pinMode(8, OUTPUT); // put your setup code here, to run once:
 }

void loop() {
  // put your main code here, to run repeatedly:
 if(Serial.available()>0)
   {
      char data= Serial.read(); // reading the data received from the bluetooth module
      switch(data)
      {
        case 'a': digitalWrite(8, HIGH);break; // when a is pressed on the app on your smart phone
        case 'd': digitalWrite(8, LOW);break; // when d is pressed on the app on your smart phone
        default : break;
      }
      Serial.println(data);
   }
   delay(50);
}
You may like it –
Control LEDs with Voice command (in 2 mins, just change code)Here’s a video tutorial which will surely make your job easy… 🙂


0 Comments