

About
The L298N Motor Driver is a controller that uses an H-Bridge to easily control the direction and speed of up to 2 DC motors. This tutorial will show you how to use it.
L298N මෝටර් ඩ්රයිවර් යනු ඩීසී මෝටර 2 ක් දක්වා දිශාව සහ වේගය පහසුවෙන් පාලනය කිරීම සඳහා එච්-බ්රිජ් භාවිතා කරන පාලකයකි. මෙම නිබන්ධනය එය භාවිතා කරන ආකාරය ඔබට පෙන්වයි.
Video InstructionsHardware:
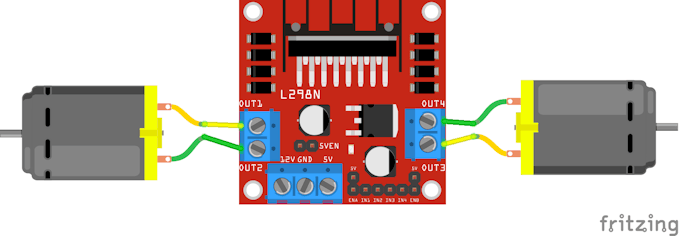
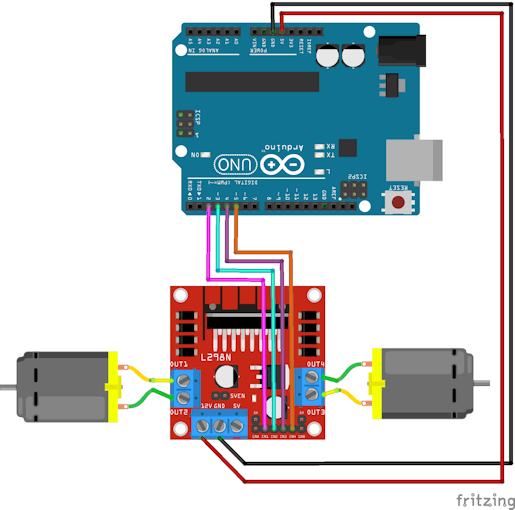
1.) The controller can take up to 2 motors. Plug one motor into the terminal labelled OUT1 and OUT2. Plug the second motor into the terminal labelled OUT3 and OUT4:
1.) පාලකයට මෝටර 2 ක් පමණ ගත හැකිය. OUT1 සහ OUT2 ලෙස ලේබල් කර ඇති ටර්මිනලයට එක් මෝටරයක් සම්බන්ධ කරන්න. OUT3 සහ OUT4 ලෙස ලේබල් කර ඇති දෙවන මෝටරය පර්යන්තයට ඇතුල් කරන්න:
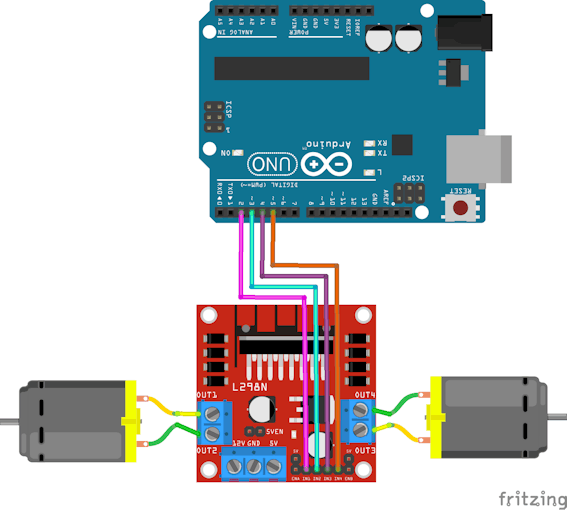
2.) The row of pins on the bottom right of the L298N control the speed and direction of the motors. IN1 and IN2 control the direction of the motor connected to OUT1 and OUT2. IN3 and IN4 control the direction of the motor connected to OUT3 and OUT4. Here I plugged them into pins 2, 3, 4, and 5 on the Arduino.
2.) L298N හි පහළ දකුණේ ඇති අල්ෙපෙනති පේළිය මෝටරවල වේගය සහ දිශාව පාලනය කරයි. IN1 සහ IN2 OUT1 සහ OUT2 හා සම්බන්ධ මෝටරයේ දිශාව පාලනය කරයි. IN3 සහ IN4 OUT3 සහ OUT4 හා සම්බන්ධ මෝටරයේ දිශාව පාලනය කරයි. මෙන්න මම ඒවා Arduino හි 2, 3, 4, සහ 5 අල්මාරිවලට සවි කළෙමි.
3.) You can power the L298N with up to 12V by plugging your power source into the pin on the L298N labelled "12V". The pin labelled "5V" is a 5V output that you can use to power your Arduino. Here are some ways to wire it depending on your use case:
Powering Arduino with L298N
3.) "12V" ලෙස ලේබල් කර ඇති L298N හි ඔබේ බල ප්රභවය පින් එකට සම්බන්ධ කිරීමෙන් ඔබට 12V දක්වා L298N බල ගැන්විය හැකිය. "5V" ලෙස නම් කර ඇති පින් එක ඔබේ ආර්ඩුයිනෝව බල ගැන්වීමට භාවිතා කළ හැකි 5V නිමැවුමකි. ඔබේ භාවිත අවස්ථාව අනුව එය කම්බි කිරීමට ක්රම කිහිපයක් මෙන්න:
L298N සමඟ Arduino බල ගැන්වීම
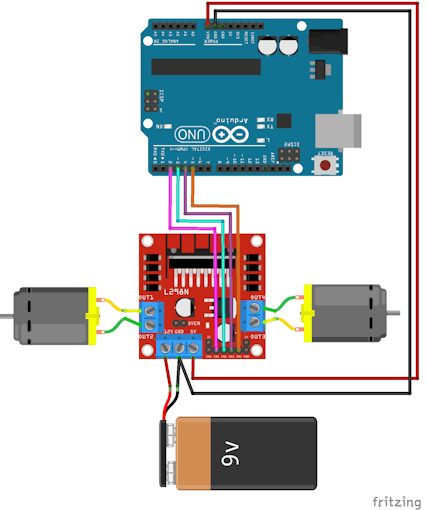
Powering L298N and Arduino Separately:
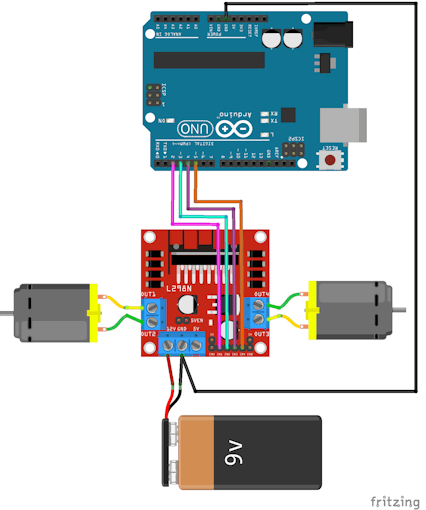
Powering L298N with Arduino:
Software:
4.) Write the code. Setting IN1 to HIGH and IN2 to LOW will cause the left motor to turn a direction. Setting IN1 to LOW and IN2 to HIGH will cause the left motor to spin the other direction. The same applies to IN3 and IN4. Here is a short example (You can download the full code in the "Code" section at the bottom of the page):
මෘදුකාංග:
4.) කේතය ලියන්න. IN1 සිට HIGH දක්වා සහ IN2 සිට LOW දක්වා සැකසීම වම් මෝටරය දිශාවට හැරවීමට හේතු වේ. IN1 සිට LOW දක්වා සහ IN2 සිට HIGH දක්වා සැකසීම වම් මෝටරය අනෙක් දිශාවට භ්රමණය වීමට හේතු වේ. IN3 සහ IN4 සඳහා ද මෙය අදාළ වේ. මෙන්න කෙටි උදාහරණයක් (පිටුවේ පතුලේ ඇති "කේතය" කොටසේ සම්පූර්ණ කේතය බාගත කළ හැකිය):
digitalWrite(motor1pin1, HIGH);
digitalWrite(motor1pin2, LOW);

digitalWrite(motor2pin1, HIGH);
digitalWrite(motor2pin2, LOW);
Speed:
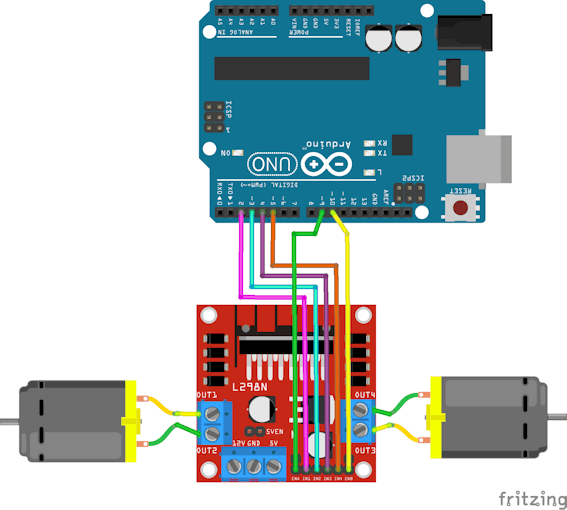
5.) You can change the speed with the EN pins using PWM. ENA controls the speed of the left motor and ENB controls the speed of the right motor. Here I plugged them into pins 9 and 10 on the Arduino. This is optional and the motors will still run if you don't do this.
වේගය:
5.) ඔබට PWM භාවිතා කරමින් EN අල්ෙපෙනති සමඟ වේගය වෙනස් කළ හැකිය. ENA වම් මෝටරයේ වේගය පාලනය කරන අතර ENB දකුණු මෝටරයේ වේගය පාලනය කරයි. මෙන්න මම ඒවා Arduino හි 9 සහ 10 අල්මාරිවලට සවි කළෙමි. මෙය අත්යවශ්ය නොවන අතර ඔබ මෙය නොකරන්නේ නම් මෝටර තවමත් ක්රියාත්මක වේ.
6.) To change the speed in the code, use the analogWrite() function (more info) on the ENA and ENB pins. Here is an example (You can download the full code in the "Code" section at the bottom of the page):
6.) කේතයේ වේගය වෙනස් කිරීම සඳහා, ඊඑන්ඒ සහ ඊඑන්බී අල්ෙපෙනතිවල ඇනලොග් වයිට් () ශ්රිතය (වැඩි විස්තර) භාවිතා කරන්න. මෙන්න උදාහරණයක් (පිටුවේ පතුලේ ඇති "කේතය" කොටසේ සම්පූර්ණ කේතය බාගත කළ හැකිය):
Coding this project :
int motor1pin1 = 2; int motor1pin2 = 3; int motor2pin1 = 4; int motor2pin2 = 5; void setup() { // put your setup code here, to run once: pinMode(motor1pin1, OUTPUT); pinMode(motor1pin2, OUTPUT); pinMode(motor2pin1, OUTPUT); pinMode(motor2pin2, OUTPUT); } void loop() { // put your main code here, to run repeatedly: digitalWrite(motor1pin1, HIGH); digitalWrite(motor1pin2, LOW); digitalWrite(motor2pin1, HIGH); digitalWrite(motor2pin2, LOW); delay(1000); digitalWrite(motor1pin1, LOW); digitalWrite(motor1pin2, HIGH); digitalWrite(motor2pin1, LOW); digitalWrite(motor2pin2, HIGH); delay(1000); }Diagram :


0 Comments